![]()
|
|
|
|
Properties, Methods, and EventsAbout ľ (Method) Display the AboutBox.ADCData ľ (Property) Byte. Returns the most recent 8-bit ADC value.BaseAddress ľ (Property) Long. Set or return the base address for the printer port to be used. Most often, LPT1 uses &H378. Check Control Panel to be sure.CancelTrigger ľ (Method) Cancel a pending WaitForTrigger. This method has no effect if a trigger has already started data acquisition.DataAvailable ľ (Event). This event is generated when acquisition of a sample buffer is complete. See the FillBuffer and WaitForTrigger methods. DataBuffer, an array of type Byte is provided as an argument to the DataAvailable event subroutine. DataBuffer contains the data just acquired.DisplayEnabled ľ (Property) Boolean. Set or return the flag that enables the Digital Scope display.FillBuffer ľ (Method). Start immediate acquisition of a sample buffer. Sample rate is specified by the SampleRate property, while the SampleSize property species the number of samples. When a buffer is complete, the DataAvailable event is generated. If the DisplayEnabled property is True, the acquired data is automatically displayed.GetADCReading ľ (Method) Acquire a single data byte. After calling GetADCReading, use the ADCData property to read the data just acquired. This function returns False if the ADC fails to initialize properly.Max ľ (Property) Single. Set or return the maximum value that will be displayed on the vertical axis of the Digital Scope display.Min ľ (Property) Single. Set or return the minimum value that will be displayed on the vertical axis of the Digital Scope display.SampleRate ľ (Property) Integer. Set or return the sample rate that is used to acquire a sample buffer when the ADC is triggered. Values that are accepted are 100, 200, 500, and 1000 Hz. Lower sample rates may be achieved by using a Timer to call GetADCReading method.SampleSize ľ (Property) Integer. Set or return the number of samples in a sample buffer. The sample buffer will be acquired when the FillBuffer method is called, or when an automatic trigger is enabled, and the trigger conditions are met.ShowGraticle - (Property) Boolean. Set or return a flag that shows an oscilloscope graticule.ShowTrigger ľ (Property) Boolean. Set or return a flag that shows a horizontal, red line on the Digital Scope display that marks the level set in the TriggerLevel property. The trigger level is also marked with a ^t. This marking makes the Digital Scope display more informative.TriggerLevel ľ (Property) Byte. Set or return the trigger level in % of maximum. Range is 1-99%. This level will be used by the WaitForTrigger method to generate an automatic trigger.TriggerSlopePlus ľ (Property) Boolean. Set or return a flag that indicates slope of a signal that is used to generate an automatic trigger in the WaitForTrigger method. True indicates that the signal must transition from less than the trigger level to greater than the trigger level to generate an automatic trigger. On the other hand, False indicates that the signal must transition from greater than the trigger level to less than the trigger level to generate an automatic trigger.Units ľ (Property) String. Set or return the units of measure that are displayed on the vertical axis of the Digital Scope display. Values are "V", "mV", "A", "mA", "deg F", "deg C", or "" (none).WaitForTrigger ľ (Method). Wait for a trigger as specified by the TriggerLevel and TriggerSlopePlus properties. When a trigger is detected, data is acquired automatically to fill a buffer specified by the SampleRate and SampleSize properties. When acquisition is complete, the DataAvailable event is generated. If the DisplayEnabled property = True, data is automatically displayed.
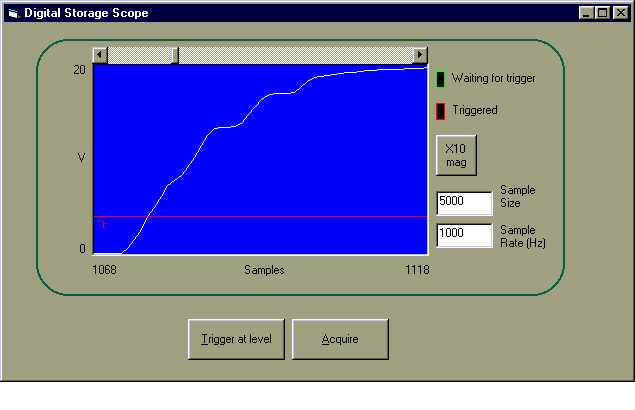
When the Digital Scope display is enabled (inside the green rounded square above), several additional items are displayed onscreen. A green LED indicates when WaitForTrigger has been called, but before the trigger conditions have been met. A red LED is used to indicate when a trigger has been generated, and while data acquisition is in process. The X10 button is used to expand (zoom) the display time. When the zoom limit is reached, the button caption changes to /10 to allow the display to be compressed in time. The horizontal scroll bar may be used to pan through the sample buffer. Sample Size and Sample Rate are displayed on screen. The extent of the sample data is displayed on the horizontal axis of the scope. Depending on the zoom factor, this can range from a few dozen samples to the entire sample size. |
|
Send mail to
dick_grier@hotmail.com with
questions or comments about this web site.
|